Wednesday, November 29, 2017

Stretchy Pants

I made a trio of CAS snarky holiday cards last night. So very fun!


The inside of this one say's "Season's Eatings"--LOL!

I'm entering this in CASology #277 Round and AAA #104 CAS Christmas


Not there yet but give me a couple more weeks and I will be.

I'm entering this in Simon Says Wednesday Anything Goes


I dirtied up the deer by adding has marks and dust clouds with a Copic Multiliner, ala Pig Pen.

I'm entering this in Cardz 4 Guyz #183 Reindeer


The Details:  Brutus Monroe Oh Deer, Hero Arts Off-Beat Holiday Messages, Zigs, Copics, Memento Tuxedo Black, Versafine Onyx Black, Canson Watercolor Paper (my fav!), PTI Poppy Cardstock, Simon Says Stitched Rectangle Die, Sizzix Embossing Folder, Copic Multiliner

Tuesday, November 28, 2017

Pageantry


We received our first Christmas cards yesterday which has lit a fire to get my craft on! Here I masked the figures to stack them but did not mask for the stenciling. Turned out a treat.

The Details:  Neat and Tangled Christmas Pageant and Radiating Stars Stencil, Versafine Onyx Black, Distress Ink Squeezed Lemonade, Copics, Pretty Pink Posh clear sequins

Monday, November 27, 2017

Merry & Brights


I played with the new Newton's Nook Holiday Foliage stencil which is so super fantastic. The first card uses a few Distress Inks to create a melange of colors. The second card uses Distress Oxides, thanks to inspiration from Amy Tsuruta who got me curious about Oxide coverage. Let's just say it rocks.  The sentiment is Mama Elephant.

Friday, November 24, 2017

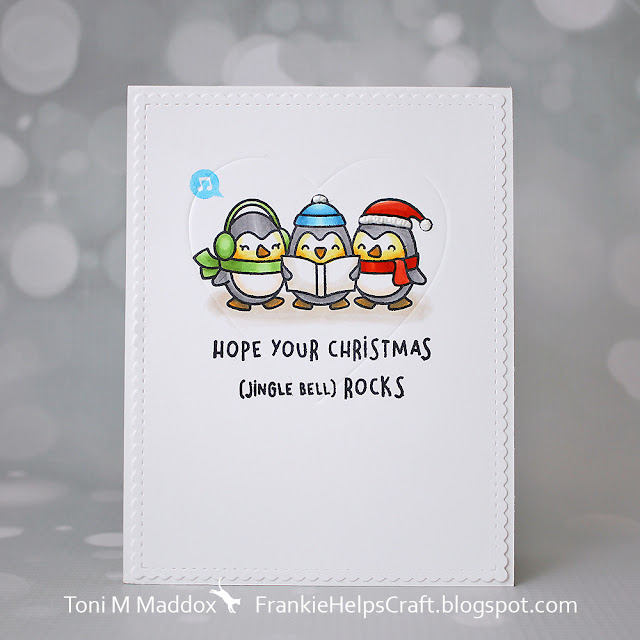
Jingle Bell Rock


A super easy CAS card. I love coloring up penguins and snowmen--so quick!

I'm entering this in CASology #276 Cheer, Lawn Fawnatics #17 Color Inspiration


The Details: Lawn Fawn Here We Go A-waddling, Copics, Memento Tuxedo Black and Bahama Blue

Thursday, November 23, 2017

Cozy Snowboy

I received the Neat and Tangled Christmas Pageant set and am actually using it the same year. What, what?!

I'm entering this in Freshly Made Sketches #314, Paper Players #371 Warm and Cozy


Tuesday, November 21, 2017

CDD Daily - Masking


Hi Divas! Toni here with you today to share a couple of masking techniques that I love and use most often. The first technique I'm showing, using the Angel Kisses set, is used to create layered images without layers. What, what? Perfect for one-layer cards or just thinner cards for mailing. 


The image you want at the very FRONT of the scene is stamped first. It is then stamped again on masking paper. My favorite masking paper is by Inkadinkado but I've used Post-Its or even just thin copy paper. What I love about the Inkadinkado paper tho is that it's super thin and easily stored with the stamps for another few maskings.
Now you cut out the image mask and cover the image you'd like to mask off. You then stamp the next image, the one meant to appear behind. Pull that mask off and check out the cool result! You can mask as many images as you want, creating various layers and effects.


The next technique I'm showing on the same card is one that masks off part of the card using tape. I did this here to create a spotlight effect. 
  • Notice the pink is quite bright but softens up when covered in the yellow. (In real life it's even prettier--like sherbet.)  Keep the change in colors in mind when you use this technique. Imagine using yellow over purple and ending up with brown--ugh. 
  • I use wide painter's tape because I am not a careful sponger. As long as the mask can be removed, you can use it. Washi tape, removable Scotch tape, and Post-Its are good options too.
  • Note I de-sticky the tape some by sticking it to my pants a few times. Nothing is more irritating than a beautifully colored scene that you just destroyed by ripping the paper when removing the tape.

To finish the card I stamped the sentiment and used Inside Scalloped Rectangle Die to frame the scene. My final touch was to cover the wings, halos and trumpets with clear glitter.

Once you've masked a few times, you'll be able to do something a bit more complicated.  Can you see how the masking worked for the below card using the Christmas Cheer set? Same concept as the first technique I showed you but just a lot more of it.


I do hope you found this useful and will show us how you were inspired!  Check back next week in the Gallery where I'll be posting another masked card using the first technique shown here. Bye for now!


Monday, November 20, 2017

CDD November Mood Board 2

My last Autumnal card although it felt like Autumn was a over a couple of weeks ago in my neck of the woods because it snowed.  S.N.O.W.  Craziness!  But I'm going to pretend it's still harvest time with my take on the CDD November Mood Board Social Media Challenge (use #CDDMonthly when you post to join in).  


I made this card twice.  The first try is above. Love the results but felt the balance was a bit off with the competing height of the cornstalks and scarecrow so I reworked it. I really wanted to reuse the background of the first card but that glue tape is stiiiiiicky. Beyond that, I like the balance much better in the new version.  How about you?


The Details:  Craftin Desert Divas  Harvest Happiness and Fall Border Dies, Distress Inks and Distress OxidesMemento Tuxedo Black, Copics, Versamark, Ranger Detail White Embossing Powder, painter's tape to mask


Sunday, November 19, 2017

Cards in Envy It's Only Paper


This fortnight at Cards in Envy, we'd like you to use paper as your focus--no stamping, no embellishments (unless made of paper). You can do it!


I used preprinted papers and dies for my card. Now I did enhance the leaves with Copics--like no line coloring by number since I was just adding shadow to what was already there!

I'm entering this in Fusion Grateful.

The Details:  Jen Hadfield Warm & Cozy 6x6 paper, Ellen Hutson Hinged Alpha dies, Copics

CDD November Release Recap Day 2


Well, boo.  My last card showcasing the new CDD release. This week flew by!  I used two of the Arctic Pals to create a wintery scene. Brrrrrrr!


The Details:  Craftin Desert Divas Arctic Pals, Outdoor Landscapes 2, Scene Builder, Snowflake Flurries Stencil, Distress Oxide Salty Ocean, Versamark, Copics, Ranger White Fine Embossing Powder, Glossy Texture Paste, Doodlebug Sugar Coating Glitter


Saturday, November 18, 2017

CDD November Release Recap Day 1

I can't believe a week of inspiration has gone by and now you're able to get all of these goodies in the Craftin Desert Divas shop. Yay!  Do you have a favorite?  Earlier I had said mine was the Holiday Sweaters set but then I made the Yeti Fun card. How am I supposed to choose??????!!!!!!!

I paired the adorable bear and kitten from Holiday Sweaters with the Christmas Eve Digi. I had forgotten how nice it is to be able to resize digis to exactly the size you want!  The Fancy Frames Die anchors the scene perfectly--notice how the bear and tree stick outside the edges--just an interesting visual for the card.


My yeti card makes my heart happy!  I love the plaid behind the mountains (notice I diecut two of the mountains from the Scene Builder Dies, just along the edge) and the plaid peeking out behind the Sending Die which I underlay with a dark version as shadow. It's really hard to see in the picture but I colored the mountains and Fall Border Die trees and houses with just a touch of purple used on the yeti. In real life, it helps create a bit more depth to the white on white.


The Details:  Craftin Desert Divas Holiday Sweaters, Fancy FramesChristmas Eve DigiSending DieScene Builder DiesFall Border Die, Doodlebug Designs Sugar Coating Glitter, Copics, VersaFine Onyx Black, Ranger Glossy Accents and Multi Medium Matte, Sakura Pinpoint Quickie Glue Pen, Uniball Pigment Pen, Gmund Savanna Limba Woodgrain cardstock, Lawn Fawn Chill Perfectly Plaid 6x6 Paper